Makeup Sponge Quality Control Checklist for Buyers
A buyer inspection guide to approved samples, dry and wet measurements, color transfer, cleaning, packaging and traceable lot decisions. Includes an editable inspection record.
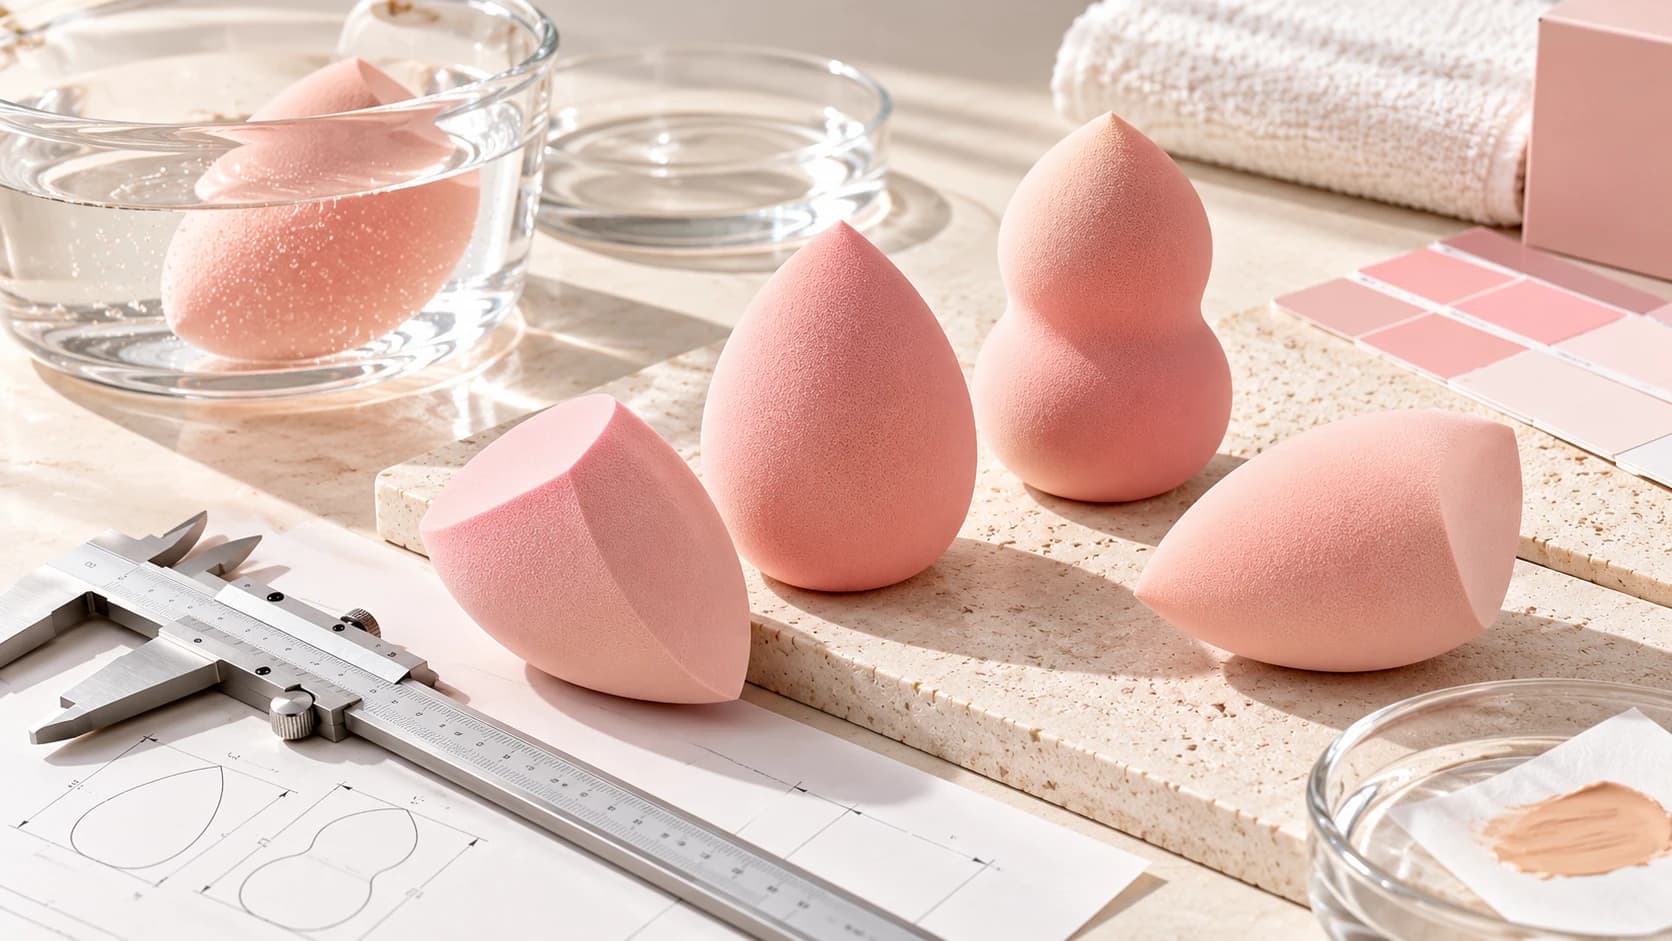
Makeup sponge quality control starts with the exact product, an approved reference and a written inspection plan. Check identity, dimensions, shape, surface, color, wet-use behavior, recovery and packaging. Record the sample, preparation and method behind each result, then compare it with the agreed requirement before approving a sample or shipment.
Use the checklist below to prepare a sample comparison, write clearer supplier requirements and record a production inspection. The scope is unfilled hydrophilic PU makeup sponges. Coated applicators, flocked puffs, layered cushion puffs, cleansing sponges and products supplied with a cosmetic formula need an adapted plan.
Makeup sponge QC at a glance
| Check | Record | Decision it supports |
|---|---|---|
| Product identity | SKU, color, material version, lot and pack configuration | Whether the sample represents the item being purchased |
| Reference and approval | Specification, drawing and approved sample IDs; dates and versions | Which requirements apply |
| Dimensions and shape | Defined measurement points, state, units and contour photographs | Whether the intended geometry has been supplied |
| Surface and dry color | Tears, fragments, visible foreign matter and comparison with the approved color | Whether appearance meets the project requirement |
| Wet expansion | Corresponding dimensions before and after the defined wetting procedure | How those dimensions change under that procedure |
| Water-related mass change | Baseline mass, wetting, drainage or dewatering, timing and final mass | The mass difference under the recorded conditions |
| Visible color release and transfer | Water appearance and marks on a specified contact material, recorded separately | Whether the agreed color-transfer requirement is met |
| Recovery and cleaning | Starting state, loading or cleaning sequence and observation times | Changes during the defined comparison |
| Intended formula | Formula reference, preparation, dose, contact surface and application sequence | Suitability for the intended makeup task |
| Packaging and lot decision | Product and pack counts, arrival condition, sampling plan, findings and authorization | Whether to approve, hold, correct or reject the inspected scope |
The companion editable inspection worksheet contains the blank records described below. It can be filled and printed without an email submission. Start with product identity, requirements and results; use the additional method and lot sections when they apply.
Download the editable inspection record · See the fields and filled teaching example
Identify the sponge, reference and inspection stage
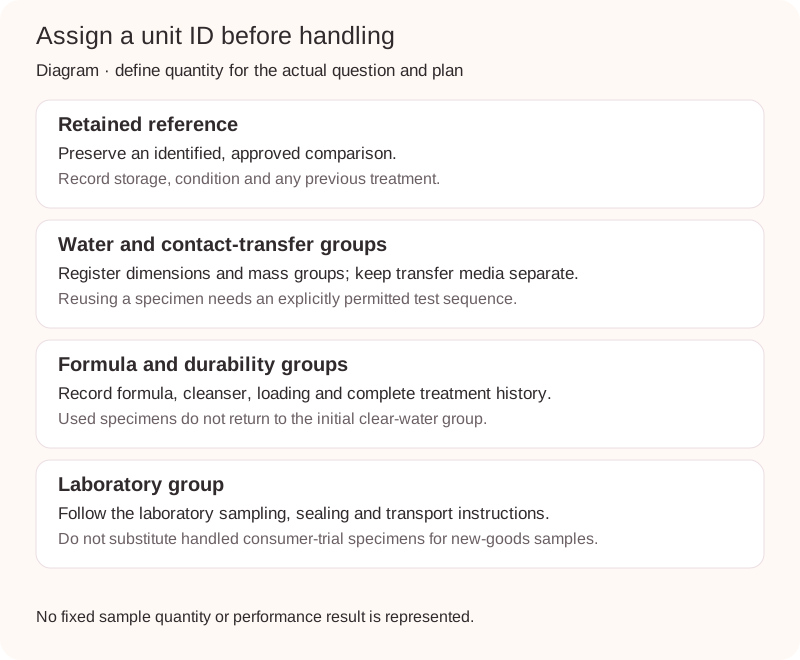
Give each inspected unit an ID before handling it. Connect the ID to the SKU, color, supplier, lot where available, and sample source. A supplier-selected development sample and a unit selected from a finished shipment represent different stages.
| Stage | Main question | Record to close |
|---|---|---|
| Development sample | Does this proposed configuration suit the intended task? | Sample comparison and unresolved requirements |
| Preproduction approval | Which exact configuration is authorized for production? | Approved specification, reference sample and change record |
| Shipment inspection | Does this defined lot meet the agreed inspection plan? | Findings, sampling decision and final disposition |
Retain the approved reference with its ID, approval date, condition and storage record. A reference that has been washed, compressed repeatedly or used with makeup needs that history recorded. Keep an unused reference when a comparison requires the initial condition.
Agree how to resolve a conflict between the drawing, specification, artwork and physical sample. Record the applicable versions and the people authorized to approve changes. A material, color, process or packaging change may require selected checks to be repeated; identify those checks before accepting the change.
Separate the test groups. Dimensions can be recorded before wetting the same registered unit, but a specimen used with foundation or cleanser should not quietly return to the initial clear-water group. Laboratory samples follow the laboratory's collection, sealing and transport instructions.
Inspect dimensions, shape, surface and dry color
Describe dimensions with endpoints and direction. For an egg profile, height and maximum diameter are useful starting points. A gourd profile also needs the waist position and width; flat-edge and angled sponges need the cut face and its orientation identified.
The egg-shaped sponge, contoured gourd, flat-edge sponge and angled sponge illustrate these different shapes. Their product pages describe configurations for enquiry; they are not measurements from this guide.
Soft foam can deform under a measuring tool. Use a recorded technique and contact force appropriate to the feature. A scaled photograph taken perpendicular to the measurement plane can help document a contour, provided the scale is in the same plane and the sponge is not stretched or compressed. Do not report more precision than the setup supports.
Record visible tears, fragments, foreign matter, rough areas and unexpected contour differences by location. A designed flat or sloping face is part of the geometry, so compare it with the correct drawing rather than calling every cut edge damage.
For color, retain a physical approved sponge or suitable color reference. Record light, background, viewing position and whether the sponge is dry or wet. A Pantone reference can communicate a target; approval on the actual foam surface establishes the project's visual reference. Dry color consistency and color transfer during use are separate checks.
Method card 1: Corresponding dry and wet dimensions
BC-SP-DIM-01, draft 0.1 — proposed buyer-comparison workflow; physical trial pending.
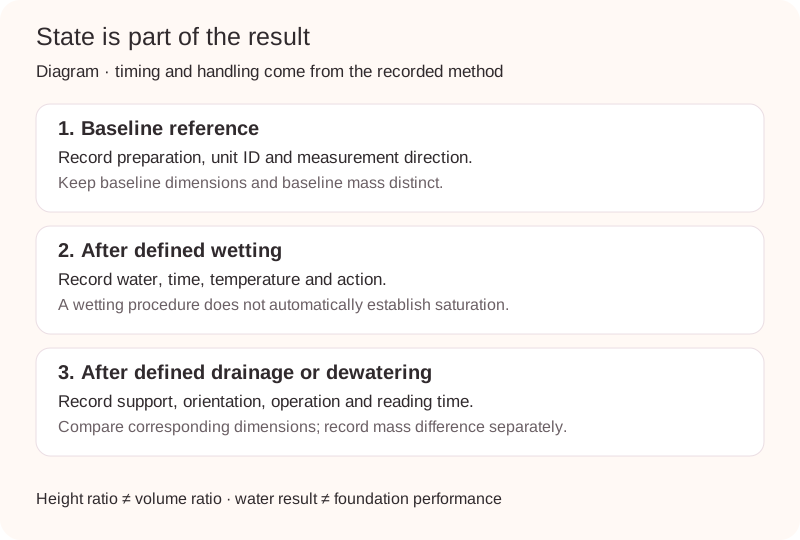
Purpose: compare a specified dimension before and after a defined wetting sequence. Use uncoated hydrophilic PU specimens with registered IDs and an approved reference prepared in the same way.
Equipment: timer, thermometer, clean water container, fixed camera or measuring arrangement, scale or ruler in the measurement plane, and a specimen register. Record the measurement arrangement and its practical resolution.
- Write the method profile before starting: conditioning, water type and temperature, wetting duration and action, drainage, observation window, measurement direction and number of specimens.
- Register each unit and its prior treatment. Condition reference and comparison units together according to the profile.
- Record the baseline height or other specified dimension without compressing the foam. Photograph the endpoints and orientation.
- Apply the written wetting and drainage sequence. Start the observation timer at the defined drainage endpoint.
- Measure the same feature in the same orientation during the specified window. Record the actual reading time and any handling deviation.
- Calculate the corresponding dimension ratio. Keep individual results and the reference results visible rather than relying only on a group average.
Output: paired dimensions, preparation, timing, photographs and any deviation for each unit. If the method has not established saturation, label the result “after the defined wetting procedure.”
Height ratio = defined wet height / recorded baseline height
Height change (%) = (defined wet height − recorded baseline height) / recorded baseline height × 100
The ratio describes height. It does not establish volume change or show that a larger expansion is better for every product brief.
Measure water-related mass change separately
A water-based mass comparison needs a baseline, a wetting sequence and a defined drainage or dewatering endpoint. The result can change when surface water or handling changes. Record those steps as part of the measurement.
Method card 2: Mass difference after defined drainage
BC-SP-MASS-01, draft 0.1 — proposed buyer-comparison workflow; physical trial pending.
Purpose: record mass change after the selected wetting and drainage sequence. Use a separately registered clear-water group so other tests do not change the baseline.
Equipment: balance with suitable range and resolution, timer, thermometer, clean water, a nonabsorbent drainage support and a tared weighing dish. Record balance identification, resolution and the check performed before use.
- Register and condition the units. Record whether the baseline is an as-received conditioned state or another defined state. “Dry reference” should not imply an oven-dry measurement that was never performed.
- Tare the dish and record each unit's baseline mass without packaging.
- Wet the unit according to the written profile. Keep the water, duration and action consistent with the reference comparison.
- Drain on the recorded support, in the specified orientation, for the specified period. If squeezing is part of another method, define its device or action and use a different method version.
- Transfer the unit to the dish and record mass within the specified window. Record the actual timing and any visible free water or transfer loss.
- Retain the baseline and final masses, the difference, specimen ID and deviations. Where repeatability is inadequate for ranking products, describe observations and refine the method before making a numerical comparison.
Mass difference (g) = mass after the defined procedure (g) − baseline mass (g)
This is an operational mass difference. It does not establish maximum water capacity, absorption rate, foundation absorption or a makeup-saving percentage. Those questions need their own definitions and suitable methods.
Worked settings for a buyer pilot
Illustrative pilot settings only. These values make the workflow concrete; they are not an industry standard, validated BlendCraft protocol, recommended acceptance limits or a lot-sampling plan. Trial and agree a suitable method before using it for acceptance.
| Profile field | Fictional example setting |
|---|---|
| Profile ID | DEMO-WATER-01, revision 0 |
| Scope and quantity | One fictional uncoated PU configuration; each water-method group has three unused comparison units plus three reference units for the exercise only; dimension and mass groups are independent |
| Conditioning | 24 hours on separate clean supports in the same indoor space; record actual temperature and relative humidity, or identify any unmeasured condition |
| Water | Fresh deionized water for each unit; 23 ± 2 °C; record actual temperature |
| Wetting | Fully submerge for 60 seconds using a clean open mesh restraint without intentional foam compression; no squeezing; record trapped air or contact changes |
| Drainage | Tip upward on a clean nonabsorbent open mesh support for 30 seconds; no squeezing, blotting or shaking |
| Dimension group | Start the height reading at 30 seconds after drainage ends; complete by 60 seconds and record actual time |
| Mass group | Independent registered units using the same preparation; start weighing at 30 seconds after drainage ends and complete by 60 seconds |
| If a step is missed | Record the deviation and keep that result separate pending review; do not silently replace it |
| Acceptance | No performance limits assigned in this teaching profile; results remain pending requirements |
The water volume, immersion depth, restraint geometry, support and measurement arrangement must also be recorded for the actual setup and kept consistent between its reference and comparison units. The example's three-unit quantity is a teaching choice, not a minimum for representative or statistical inspection. Reference specimens are real physical controls in an actual trial; the results shown later are fictional arithmetic only.
Record color release and contact transfer separately
Water that becomes colored, a mark on white material and a color change in the intended formula are different observations. Record them separately, with the water or medium, specimen state, contact conditions and photographs.
Beautyblender's FAQ explains dye release for its own products. That brand-specific explanation cannot determine whether another sponge meets a buyer's specification or supports its safety claims.
Method card 3: Visible color transfer to a defined contact material
BC-SP-TRANSFER-01, draft 0.1 — proposed buyer-comparison workflow; physical trial pending.
Purpose: document visible transfer under a defined contact setup. Select an unused independent group, a suitable white contact material and an uncontacted control piece from the same material batch.
Equipment: registered contact material, clean flat nonabsorbent support, timer, measured load or loading fixture, defined water preparation where relevant, and a fixed photographic setup.
- Record the contact material's identity, preparation, lot and condition. Photograph the unused material and control under the same lighting.
- Define whether the sponge is tested as received, after the specified water procedure or in another state. Use a separate method version for a different medium or preparation.
- Specify the sponge face, orientation, load, contact duration and whether movement occurs. Use the same fixture for reference and comparison units.
- Position the sponge on a fresh contact piece, apply the recorded loading sequence, and time the contact.
- Remove the sponge. Record marks on the contact material separately from water color. Photograph the test piece alongside the unused control at the specified observation times.
- Compare the observation with the agreed visual reference or acceptance wording. Record the finding, evidence and next action without inferring chemical composition from a mark.
Illustrative contact profile, not a validated procedure: a fictional buyer pilot uses a preidentified white cotton pad and a specified flat face on a fictional uncoated sponge after DEMO-WATER-01 preparation. Contact starts 30 seconds after drainage ends, with a 200 g combined platen-and-weight load for 60 seconds without rubbing; photographs are taken immediately after separation and after 10 minutes. The contact area, platen geometry, fabric preparation and actual settings are recorded before use. These example settings have no established pass/fail limit or demonstrated sensitivity. They require physical trial before adoption; a different face, material or preparation is a different comparison.
Where a contract uses a laboratory colorfastness or chemical requirement, use the applicable method and evidence. A visible contact comparison does not substitute for that work.
Compare recovery, cleaning, odor and drying
A recovery comparison needs a defined starting state, loading arrangement, deformation, dwell and recovery observation times. Record shape change, tears and fragments against the approved reference. Repeated hand squeezing can reveal an observation, but it does not by itself establish standardized compression set or service life.
For cleaning, specify cleanser identity and concentration, water temperature, handling, rinse sequence, drying arrangement, cycles and observation points. Follow the intended care directions when evaluating normal use. Keep deliberately harsher exploration separate.
Record odor in the state actually assessed: sealed pack, immediately after unpacking, or after a defined waiting or wetting procedure. Describe the observation and the agreed follow-up. Odor alone cannot identify an ingredient or establish safety.
For drying, record the environment, airflow, orientation and elapsed time. If drying time is a claim, define a suitable endpoint and method. Surface feel alone may not establish the condition inside the sponge. A small number of cleaning cycles cannot be converted into a universal number of months of consumer use.
Evaluate the intended formula in its own comparison
Water uptake and foundation performance answer different questions. A formula comparison also depends on the formula, dose, preparation, contact surface and application sequence. Match the actual intended use and retain its conditions.
Record the product and formula batch, starting amount, wet or dry preparation, application surface and area, evaluator, movement or task, additions, lighting and observations. Use a consistent comparison task and explain differences when products require different preparation. Real Techniques, for example, specifies dry use for its Makeupsaver Sponge; that instruction is specific to that product.
Useful observations include grip, access to the intended application area, visible streaking, fragments and whether additional formula was needed to finish the task. A wet sponge's mass gain after makeup use can include water and other residues. A numerical absorption or saving claim requires an appropriate quantitative method, controls and evidence.
Choose evidence for the question being asked
Use a product requirement for the product decision, a suitable method for the measurement, and a sampling plan for the lot decision. Keep supplier-audit information separate from product results.
| Reference | What the public source supports | What to discuss with the supplier or laboratory |
|---|---|---|
| GB/T 38088-2019 | A current Chinese recommended product standard titled Make-up accessories—Powder puff | Confirm the product classification and applicable requirements using the standard itself; do not treat it as a worldwide certification |
| ASTM D3574-25 | Methods for flexible polyurethane foam materials | Identify the exact test, suitable specimen preparation and conditions; a finished sponge hand check is not automatically a standard test |
| ISO 845:2006 | Apparent density of cellular plastics and rubbers | Ask whether the actual specimen and procedure support the proposed density statement |
| ISO 1798:2008 | Tensile strength and elongation at break of flexible cellular materials | Confirm the specimen and method needed; pulling a finished sponge by hand is a different observation |
| ISO 2859-1:2026 or an agreed alternative | Attribute acceptance sampling | Select and record the complete applicable scheme and product requirements before inspection |
These descriptions use public scope information, not reproduced test clauses or tables. Use the complete applicable standard for execution.
For claims such as latex-free, low absorption or biodegradability, identify exactly what is claimed and which component or product version it covers. Request appropriate evidence linked to the supplied configuration, its sample identity, method, date and result. One generic report cannot answer every claim.
Record evidence as received and matched, scope pending, not provided, or not applicable with a reason. Hygiene and chemical questions require suitable sampling and analysis. Supplier BSCI audit information concerns the facility and does not establish an individual sponge's absorption, recovery or safety performance.
Inspect packaging and make the lot decision traceable
Record the delivered configuration, quantities, labels, artwork, barcode where specified, and retail packs per case. Keep sponge-piece counts separate from retail-pack counts.
Photograph arrival condition, unpacked condition and the agreed later observation point where compression is relevant. Compare the result with the approved packaging and recovery requirement. Keep the observation separate from an unverified explanation of its cause.
Before shipment inspection, define the lot boundary and inspection unit. State how SKU, color, material version and packaging configuration are represented. Record the selection procedure and selected box or location IDs. A group average should not hide differences among configurations or individual units.
If an AQL-based plan applies, record the standard and edition, scheme, inspection level and severity, plan type, AQL values, sample sizes and acceptance/rejection parameters required by that plan. Apply its relevant rules, including switching where applicable. Different versions or tables should not be mixed. The official ISO 2859-1:2026 overview describes its role in attribute acceptance sampling; the full selected scheme is needed to use it.
Performance trials, destructive checks and laboratory sampling can require different specimen allocations. Passing one inspection does not establish that every unit is acceptable or that every safety claim has been demonstrated.
Record nonconforming units separately from the number of observations. Classify findings by the agreed requirement and their consequences. A correction record should identify affected goods, action owner, reinspection scope and decision authority. Do not close a failed inspection by selecting a few better-looking replacements without an agreed disposition and reinspection process.
Use the inspection record
Keep the following fields in the record, even when a short first review uses only the relevant sections.
| Record section | Required information |
|---|---|
| Product and stage | Buyer, project/PO, supplier, stage, SKU, color, lot, lot quantity and inspection unit |
| Approval basis | Specification/drawing/artwork/pack versions, reference ID/date/condition, document priority agreement and authorizer |
| Method and specimens | Method/profile IDs and versions, specimen IDs, allocation, prior history, equipment, conditioning and actual settings |
| Result | Check, unit ID, condition, requirement and source, raw result with units, evidence ID, deviation and check decision |
| Sampling, where applicable | Lot boundary, selection and location IDs, complete plan identity and decision parameters, inspected quantities and counts |
| Finding and action | Location, affected configuration, classification/reason, containment, correction, owner and reinspection |
| Closure | Sample decision or lot disposition, unresolved items, decision basis, authorizer and date |
Use distinct statuses: Not tested, Pending requirement, Pass, Fail, Hold for review, and Not applicable—with reason. Empty cells should not imply a pass. A completed worksheet preserves a decision; it does not create approval automatically.
Filled teaching record: a result that still needs a requirement
Fictional arithmetic and record example. No product was tested, no photograph or laboratory report is represented, and none of these numbers describes a BlendCraft SKU.
| Field | Teaching entry |
|---|---|
| Project / stage | DEMO-PROJECT / development sample comparison |
| Product / specimen | DEMO-SP-01 / DEMO-A-01; fictional uncoated PU configuration |
| Approval basis | DEMO-SPEC-R0; reference sample not yet approved |
| Method | BC-SP-DIM-01 draft 0.1; DEMO-WATER-01 revision 0 |
| Illustrative raw dimensions | Baseline height 50 mm; defined wet height 75 mm |
| Arithmetic | Height ratio 1.50; height change +50% |
| Separate mass specimen | DEMO-B-01; baseline 7 g; after the defined procedure 21 g; difference 14 g |
| Evidence | Text-only teaching example; no inspection evidence attached |
| Acceptance criterion | Not agreed; sample quantities and method require pilot review |
| Check status | Pending requirement |
| Sample disposition | Hold for review: agree method and acceptance before approval |
| Lot disposition | Not assessed; no shipment sampling plan or shipment results exist |
The useful conclusion is the recorded hold and the next action. Neither a large expansion nor a larger mass difference supplies the missing requirement. In a real record, the actual conditions, timing, raw measurements and evidence would also be completed.
Frequently asked questions
What should a makeup sponge QC checklist include?
Include product identity, approval basis, dimensions, shape, surface, color, applicable wet-use and recovery comparisons, packaging and the inspection decision. Connect each result to its unit, preparation, method, evidence and requirement. Add the complete sampling record when the decision concerns a lot.
Does greater wet expansion always mean better quality?
Expansion describes a defined change under a defined preparation. Judge it against the intended shape, handling and project requirement. Keep the measured direction clear: a height ratio is not a volume ratio. A larger number alone cannot approve a product.
Can a water test prove low foundation absorption?
A water result describes the selected water procedure. Foundation performance also depends on formula, preparation, dose, contact surface and application. Evaluate that task separately and use suitable evidence for quantitative makeup-saving claims.
Is colored rinse water the same as color transfer?
They are separate observations. Record water appearance and marks on a specified contact material under defined conditions. Compare each with the agreed requirement. Neither observation alone determines chemical safety.
Can weight, pore appearance or touch identify the material?
Those observations can help describe a sample or investigate a difference. They do not establish the exact foam identity or validate a material claim. Match appropriate supplier documentation and testing to the actual configuration.
Do makeup sponges and powder puffs need the same checks?
They can share identity, appearance and packaging checks. Their structures and intended use may require different performance methods. Adapt the plan for flocking, textile layers, seams, coatings or other construction rather than applying every PU-sponge method unchanged.
Does an approved sample or an AQL result prove every unit is acceptable?
An approved sample defines an accepted reference; a lot inspection applies its recorded plan to the defined lot. Neither establishes that every future or uninspected unit is acceptable. Keep sample approval, lot disposition and claim evidence as separate records.
Discuss your sponge specification
Bring a reference or preferred format, intended use, target color, packaging, quantity, destination market and the checks you want to confirm. The makeup sponge and powder puff collection provides a starting point; the wholesale sourcing guide covers the broader purchasing brief.
Use the contact form to discuss the configuration and available evidence. A completed inspection record can help identify the requirements still needing agreement.
Sources and method status
- GB/T 38088-2019 official catalogue: standard identity and current status. Applicable clauses require the standard itself.
- ASTM D3574-25, ISO 845:2006, ISO 1798:2008, and ISO 2859-1:2026: public method or sampling scopes. No proprietary tables or unseen clauses are reproduced.
- Beautyblender FAQ and Real Techniques Makeupsaver: instructions or explanations for those brands' specified products only.
- BC-SP method cards, sample allocation and worksheet design are proposed editorial tools. The DEMO profile and filled record are teaching examples. Physical pilot results and independent laboratory evidence have not been supplied for this guide.
Continue with the hair brush QC checklist or makeup brush QC checklist for construction-specific inspections.
Continue reading
Related Guides
Makeup Sponge Wholesale & Manufacturing Guide for Buyers
A practical B2B guide to makeup sponge shapes, material evidence, sample evaluation, customization, quality control, packaging and quotations.
Hair Brush Quality Control Checklist for Buyers
A practical inspection guide for brands and sourcing teams reviewing pins, bristles, cushions, brush bodies, branding and packaging against an approved sample.
Makeup Brush Quality Control Checklist for Private Label Brands
A specification-led inspection guide for private label teams reviewing makeup brush samples, components, assembly, branding, packaging and shipment readiness.
Eyelash Curler Quality Control: A Practical Sourcing Guide
For brands and retail buyers comparing mechanical eyelash curlers: learn what to check in a sample, how to record defects, and which specifications to agree before production.